Crochet-iversary

When I checked my Facebook memories this morning, I saw the following post from 12 years ago:

I still remember it! I was pregnant with Laura and after several failed attempts, I had decided that I was finally going to learn. I thought it would be fun to look back on my journey!


learning to crochet
First stitches! February 2009
just fold up the sides
My first dishcloth! Completed February 4, 2009
crochet baby sweater
Baby sweater – March 12, 2009
ripple afghan
My first completed blanket – May 3, 2009
attic24 bag flower detail
My Attic24 bag – May 2009
baby hat with oversized rose
Baby hat – April 2011
Country Christmas Crochet Garland
Christmas Tree Garland – November 5, 2012
Crochet jellyfish
Octopi Amigurumi – May 2016
C2C Blanket with Caron Cakes Yarn
C2C (Corner to Corner) Blanket – November 2016
Atlanticus CAL through part 4
Atlanticus blanket in progress – July 2017
Triangle scarf
Triangle Scarf – December 2017
River Rock Blanket
River Rock Blanket – January 2019

It’s so fun to look back on all of the projects I’ve completed over the years (this is just a small selection)! Last year I honestly didn’t do much crochet, save for some dishcloths. Seems I lost my cro-jo a bit. But I feel like it’s so worth it to make time for the things that make you feel good, and I am definitely in need of a creative outlet.

So maybe this weekend I’ll actually pick up my hook (or knitting needles — I haven’t knit in ages, either) and see what inspires me!

Unique, Handmade Valentine’s Day Card + A Free Printable!

Untitled

I realize than many people dislike Valentine’s Day, but I am not one of them. I’m all about the love, the chocolate, the hearts, the flowers, and especially the cards! I think one of the reasons a lot of people don’t like this holiday is because of the perceived pressure to spend, spend, spend. I totally get that, and I’m here to tell you that really, the best Valentine gift for your sweetie is one from the heart. A simple, handmade Valentine with a heartfelt sentiment will no doubt be appreciated beyond an expensive dinner in a restaurant or pricey jewelry. Read on to find out how I made this unique bouquet card for Valentine’s Day

When ProFlowers invited me to participate in their DIY challenge to create a beautiful handmade card, I was definitely up for it! I wanted to put a little bit of a twist on my card, and I have to say — I’m quite pleased with my project!

ProFlowers Valentine Card Challenge

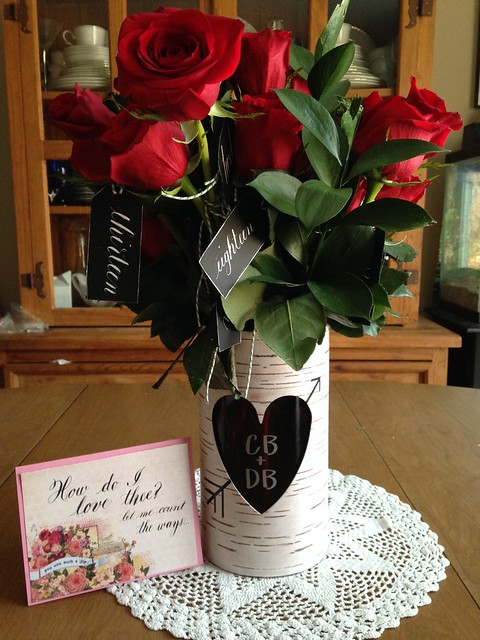
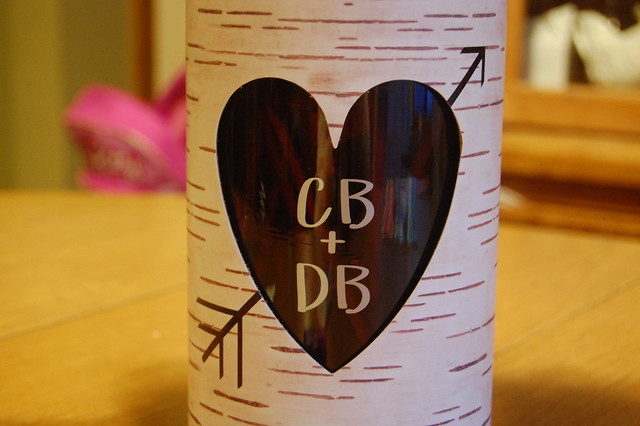
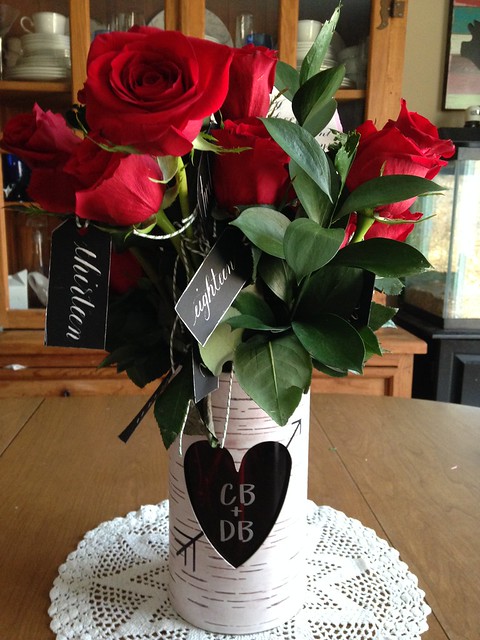
The selection of Valentine’s Day flowers at ProFlowers is full of beautiful choices. It was not easy picking something to work with — my head was spinning with dozens of ideas! But I ultimately hose a bouquet of 18 long-stemmed red roses because I wanted something classic. Because I absolutely love roses anytime of year, but especially on Valentine’s Day, I decided to make the flowers part of my card. ProFlowers has some really cute vases to go with their Valentine bouquets, and I absolutely fell in love with the Rustic Heart vase. Not only does it fit right into my home decor, but I immediately knew how I could personalize it.

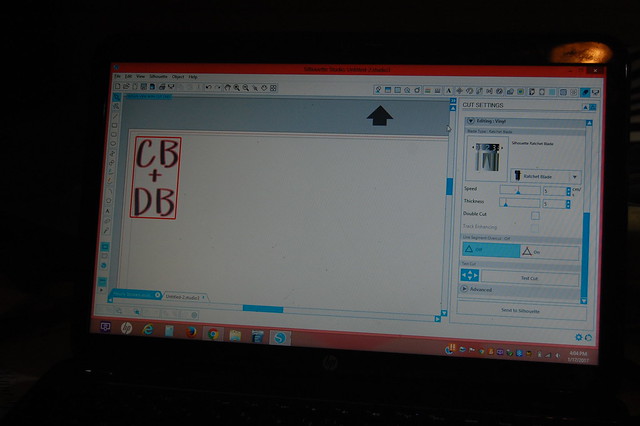
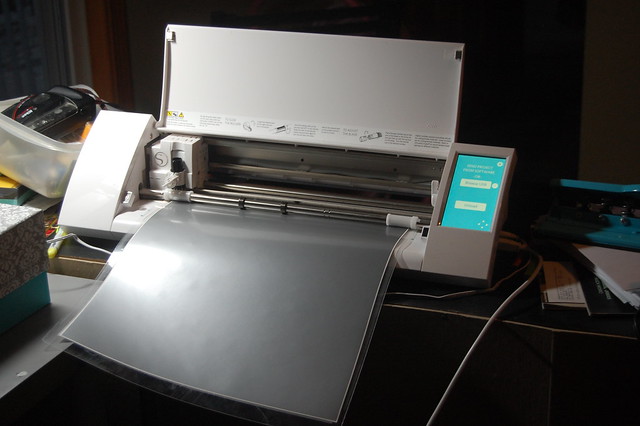
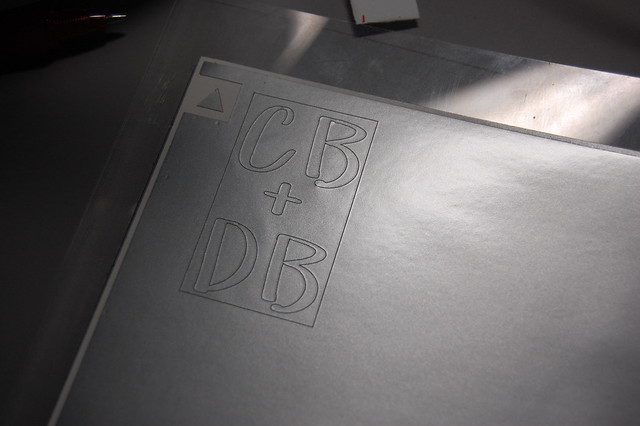
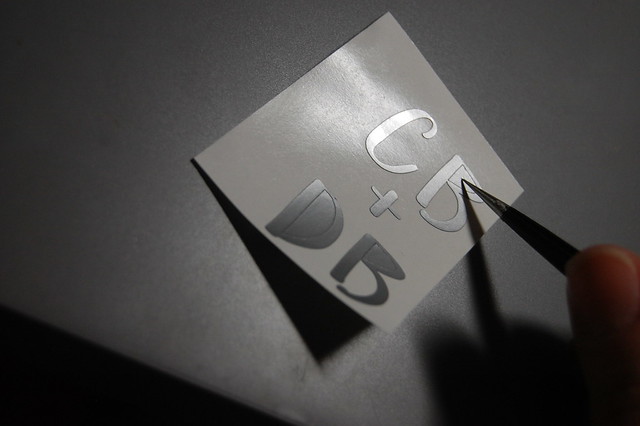
The first thing I tackled was the vase. It looks like a heart carved into a birch tree, so it seemed obvious to make sure my husband’s and my initials were on there! I cut them them out of silver vinyl using my Silhouette Cameo, but you could easily use stickers or even a paint pen!

ProFlowers Valentine Card Challenge

ProFlowers Valentine Card Challenge

ProFlowers Valentine Card Challenge

ProFlowers Valentine Card Challenge

ProFlowers Valentine Card Challenge

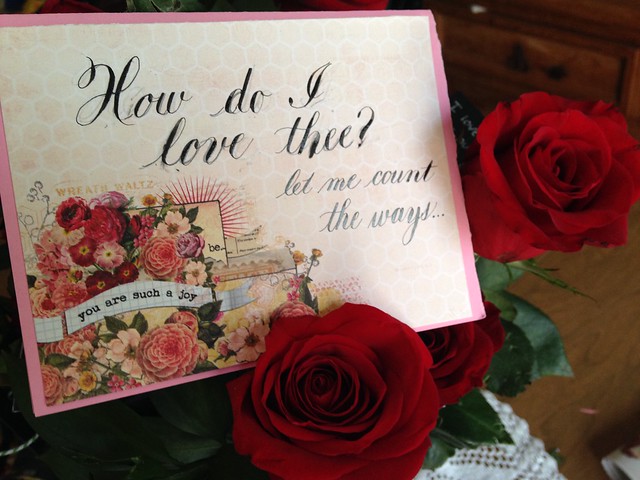
Next was to create the card. As I arranged the roses in the vase, Shakespeare popped into my head. How do I love thee? Let me count the ways!  There was my inspiration! I made a simple folded card out of cardstock and scrapbooking paper. Then, I lettered the beginning of the sonnet. 

Untitled

The rest of the “card” is hanging off the roses themselves. I cut tags out of black cardstock and ran a silver paint marker around the edges.

ProFlowers Valentine Card Challenge

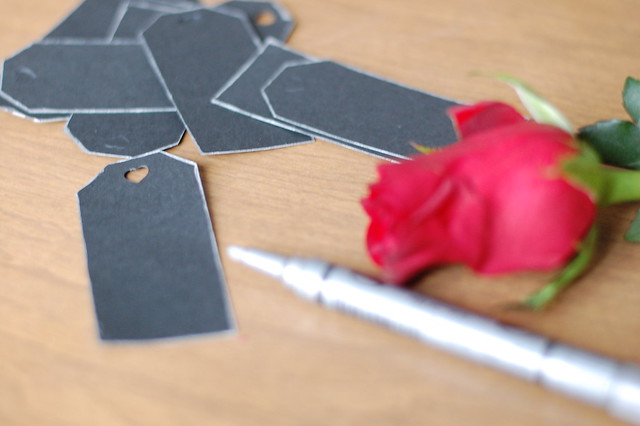
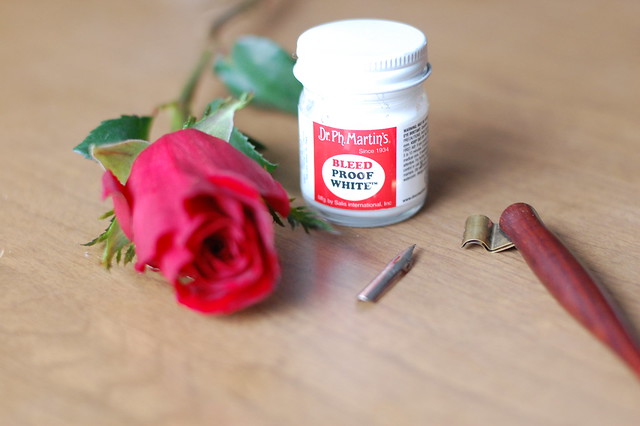
Then I wrote out one through eighteen on one side of the tag. I used my favorite oblique holder, a Zebra G nib, and Dr. P.H. Martin’s Bleedproof White ink, my favorite white!

ProFlowers Valentine Card Challenge

DSC_0859

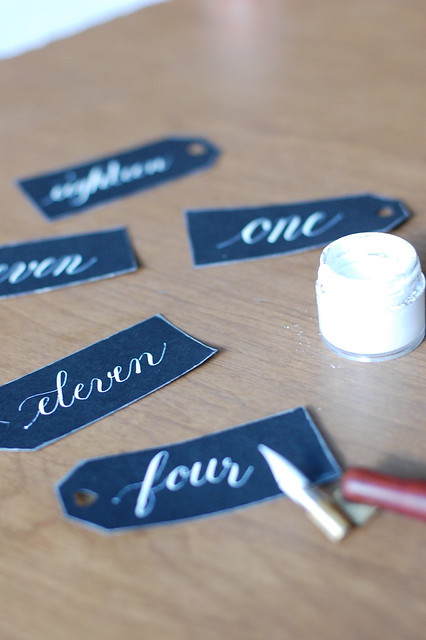
On the other side I wrote down why I love my husband. I tried to include a mix of silly and sappy reasons. I knew that I would enjoy finding each hand-lettered tag and spending time reading over every one of them.

DSC_0863

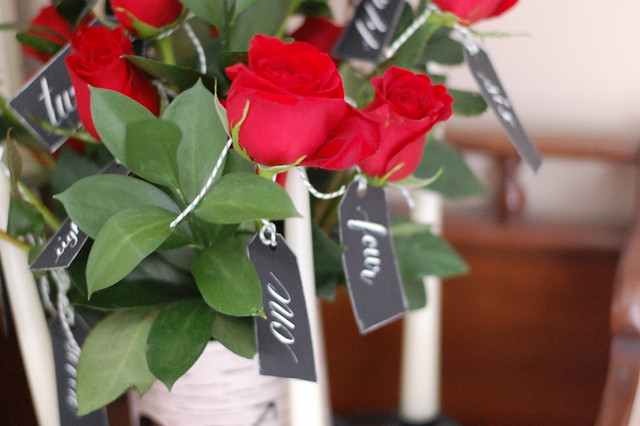
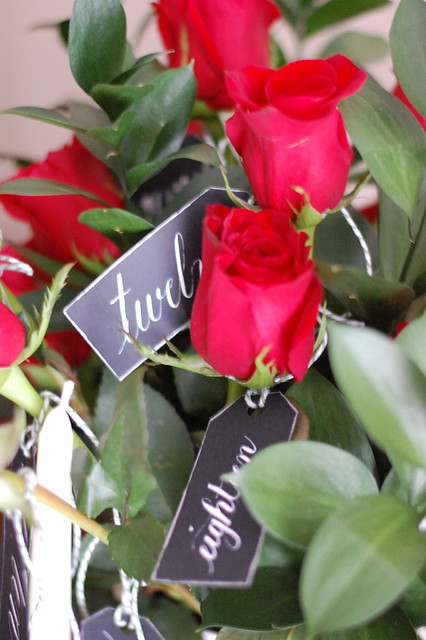
Then I looped baker’s twine through the holes and attached each tag to one of the roses.

ProFlowers Valentine Card Challenge

ProFlowers Valentine Card Challenge

Untitled

If you’d like to recreate this bouquet card but don’t have calligraphy skills, don’t worry! You can write the numbers in cursive and then thicken the downstrokes to create “faux calligraphy.” Or, you could print out these free tags on cardstock, cut them out, and write your own messages on the back! 

Free Printable Number Tags

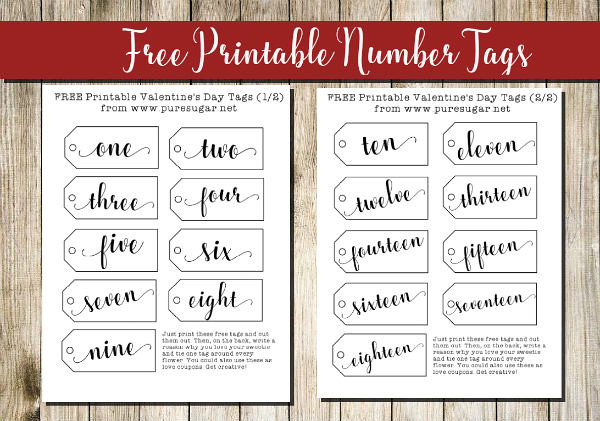
Download your free tags here!
Numbers one-nine and numbers ten-eighteen.

I hope you’ll give a homemade card or gift a try. If you do, please make sure to share a photo or a description of your project with me! I want to hear all about how you are going to make it a handmade Valentine’s Day this year!

In order to facilitate this post, ProFlowers provided me with a free floral bouquet and vase. I received no further compensation. All opinions are my own.

Back Mad Match on Kickstarter!

madmatch

Do you like puns? Do you like tabletop games? Then please check out my husband’s Kickstarter for Mad Match! He (and we) have worked very hard on this game, from concept, to card design, to play testing… And trust me it is a ton of fun and easy to learn.

Today we are having a special promotion since it’s the 3rd and the game works in 3’s. Join our 3 on 3 pledge blitz – add an exclusive expansion to your pledge for only $3 on August 3rd! It’s a great deal and you’ll help get this awesome game funded. We are halfway there — please check it out, share, and support if you can!

applesaucer

Can It, Bake It, Grow It, Swap It!!!

Clinton Community Library Food Swap

Last week when I was talking about my carrot cake jam, I mentioned that I was making it for a food swap our library was hosting. I knew that there would be some tasty treats there (we have a large population of excellent cooks in our community), and the results did not disappoint!

So… what is a food swap and how does it work? Well, basically you bake, can, grow, forage, or otherwise bring something to the proverbial (and literal) table. You taste. You talk. You trade. It was so fun, and a great way to engage with our neighbors! We had many curious patrons who expressed interest in participating in our next go-around. And I hope they do! What a fun way to try new things.

Here’s what we had today…

Cookies:::
Clinton Community Library Food Swap

Ginger-chocolate mini scones:::
Clinton Community Library Food Swap

(My) carrot cake jam:::
Clinton Community Library Food Swap

Granola:::
Clinton Community Library Food Swap

Fresh honey nut butter:::
Clinton Community Library Food Swap

Local eggs from happy chickens:::
Clinton Community Library Food Swap

Sriracha (better than anything with a rooster on it — trust me!):::
Clinton Community Library Food Swap

Handcrafted vanilla extract:::
Clinton Community Library Food Swap

Spicy Guinness Mustard:::
Clinton Community Library Food Swap

We shall eat well, indeed! I feel a little bit spoiled, and a lot bit lucky to be part of this.

I am already thinking ahead and deciding what to make for our next one. Perhaps some fermented sauerkraut or spicy pickled vegetables? I definitely think it will be something fresh and vinegary. But homemade hot fudge could be fun too… So many delicious possibilities!

It’s A Miracle! My Grout is Clean!

DSC_0011

This is such a horrifying post to write, because I feel like it makes me look like a terrible housekeeper since the grout in my kitchen is so gross. But I have a feeling a lot of people struggle with the issue of cleaning grout. When we moved in (eight years ago!), we had no idea that the builder never sealed the grout on our kitchen tile floor. (And it’s a huge kitchen). It didn’t take long for the dirt to set in.

Over the years I’ve tried various methods of grout cleaning and nothing seemed to work. Then, the other day I was browsing Pinterest when I stumbled upon the miracle of miracles — a grout cleaner that does the job! Hat tip to Accessorize and Organize for this amazing discovery!

Could it really be this simple? Yes. Yes it could. Yes it is. Just… YES!!! All it is, is one part bleach to three parts baking soda. How amazing is that? OK, you might think that I’m way too excited about this, but lately the grout has really been getting me down and I was at a loss. But just look at this:

DSC_0008

DSC_0012

Shut the front, door! Right? Of course, now that I have something that works, I will be scrubbing my kitchen and hallway floors every night for the next two weeks until the job is done, but hey… I can live with that. Then you bet I’m getting my butt to the hardware store for some grout sealer.

DIY Homemade Grout Cleaner Paste

1/4 cup bleach
3/4 cup baking soda

Mix together until a paste forms. Apply to grout lines and use a toothbrush to scrub. Leave the paste on for an addition 10 minutes and then wipe clean with a damp cloth.

I can’t believe what little effort it took to clean the grout. The dirt just melted away. The recipe as given above does not make a whole lot, so you will probably need to make several small batches depending on the size of your tiled area. The one caveat: cleanup is a huge PITA. The baking soda likes to stick to the tile, so just be aware of that. Even so, it’s just time-consuming and not difficult, so if you really want your grout clean (like I do!) it’s worth the effort!